WPFUIGallery Fluent风格UI框架库学习,作为我初入WPF UI的学习第一站。
什么是Fluent风格 Fluent 风格就是微软的一套界面设计语言 ,Windows 11 的设置、文件资源管理器等界面,就能让你直观感受到这种风格。
它不只是“圆角”,还包括这些特点:
| 特点 | 直观表现 |
| ————– | —————————————— |
| 圆角与简洁布局 | 按钮、输入框、卡片边角柔和,留白充足 |
| 层次感 | 用背景、边框、阴影区分页面、卡片和弹窗 |
| 材质效果 | 部分背景带有半透明、模糊或壁纸色调 |
| 交互反馈 | 鼠标悬停、点击、切换页面时有颜色变化和动画 |
| 统一的视觉规范 | 字体、图标、间距、配色保持一致 |
| 浅色与深色主题 | 两种模式下都有协调的颜色和对比度 |
官方主题配置 首先编辑 App.xaml
1
2
3
4
5
6
7
8
9
<Application x:Class="WpfUiDemo.App" xmlns="http://schemas.microsoft.com/winfx/2006/xaml/presentation" xmlns:x="http://schemas.microsoft.com/winfx/2006/xaml" xmlns:local="clr-namespace:WpfUiDemo" StartupUri="MainWindow.xaml"> <Application.Resources> </Application.Resources> </Application>
添加 xmlns:ui="http://schemas.lepo.co/wpfui/2022/xaml" 定义命名空间ui
1
2
3
4
5
6
7
8
9
10
11
12
13
14
15
<Application x:Class="WpfUiDemo.App" xmlns="http://schemas.microsoft.com/winfx/2006/xaml/presentation" xmlns:x="http://schemas.microsoft.com/winfx/2006/xaml" xmlns:ui="http://schemas.lepo.co/wpfui/2022/xaml" xmlns:local="clr-namespace:WpfUiDemo" StartupUri="MainWindow.xaml"> <Application.Resources> <ResourceDictionary> <ResourceDictionary.MergedDictionaries> <ui:ThemesDictionary Theme="Light" /> <!-- 资源字典标签 提供主题资源 设置了浅色主题 --> <ui:ControlsDictionary /> <!-- 资源字典 提供控件的样式和模板 --> </ResourceDictionary.MergedDictionaries> </ResourceDictionary> </Application.Resources> </Application>
界面编写 初始代码长这样
1
2
3
4
5
6
7
8
9
10
11
12
<Window x:Class="WpfUiDemo.MainWindow" xmlns="http://schemas.microsoft.com/winfx/2006/xaml/presentation" xmlns:x="http://schemas.microsoft.com/winfx/2006/xaml" xmlns:d="http://schemas.microsoft.com/expression/blend/2008" xmlns:mc="http://schemas.openxmlformats.org/markup-compatibility/2006" xmlns:local="clr-namespace:WpfUiDemo" mc:Ignorable="d" Title="MainWindow" Height="450" Width="800"> <Grid> </Grid> </Window>
修改完
1
2
3
4
5
6
7
8
9
10
11
12
13
14
15
16
17
18
19
20
21
22
23
24
25
26
27
28
29
30
31
32
33
34
35
36
37
38
39
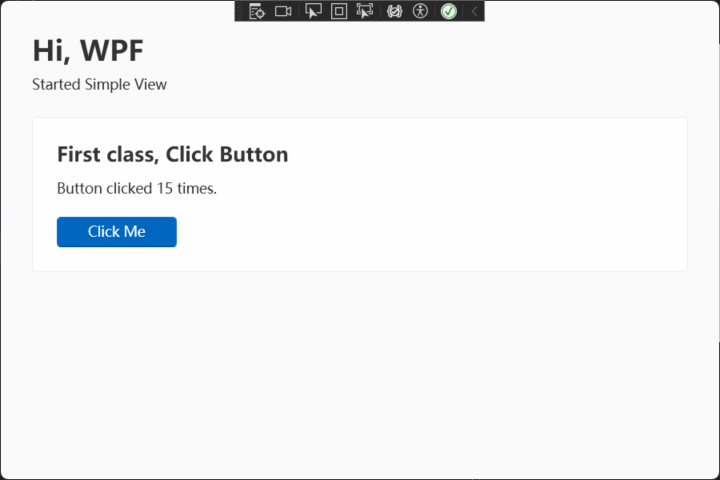
<ui:FluentWindow x:Class="WpfUiDemo.MainWindow" xmlns="http://schemas.microsoft.com/winfx/2006/xaml/presentation" xmlns:x="http://schemas.microsoft.com/winfx/2006/xaml" xmlns:d="http://schemas.microsoft.com/expression/blend/2008" xmlns:mc="http://schemas.openxmlformats.org/markup-compatibility/2006" xmlns:ui="http://schemas.lepo.co/wpfui/2022/xaml" xmlns:local="clr-namespace:WpfUiDemo" mc:Ignorable="d" Title="MainWindow" Width="720" Height="480" WindowStartupLocation="CenterScreen" Background="{DynamicResource ApplicationBackgroundBrush}" Foreground="{DynamicResource TextFillColorPrimaryBrush}"> <Grid Margin="32"> <Grid.RowDefinitions> <RowDefinition Height="Auto" /> <RowDefinition Height="*" /> </Grid.RowDefinitions> <StackPanel> <TextBlock Text="Hi, WPF" FontSize="28" FontWeight="SemiBold" /> <TextBlock Text="Started Simple View" Margin="0,8,0,24" /> </StackPanel> <ui:Card Grid.Row="1" Padding="24" VerticalAlignment="Top"> <StackPanel> <TextBlock Text="First class, Click Button" FontSize="20" FontWeight="SemiBold"/> <TextBlock x:Name="ResultText" Text="You not click Button" Margin="0,12,0,20" /> <ui:Button Content="Click Me" Width="120" Appearance="Primary" Click="Button_Click" /> </StackPanel> </ui:Card> </Grid> </ui:FluentWindow>
界面如下
然后添加按钮行为
原代码
1
2
3
4
5
6
7
8
9
10
11
12
13
14
15
16
17
18
19
20
21
22
23
using System.Text;using System.Windows;using System.Windows.Controls;using System.Windows.Data;using System.Windows.Documents;using System.Windows.Input;using System.Windows.Media;using System.Windows.Media.Imaging;using System.Windows.Navigation;using System.Windows.Shapes;namespace WpfUiDemo ;public partial class MainWindow : Window { public MainWindow () { InitializeComponent(); } }
更新代码
1
2
3
4
5
6
7
8
9
10
11
12
13
14
15
16
17
18
19
20
using System.Windows;using Wpf.Ui.Controls;namespace WpfUiDemo ;public partial class MainWindow : FluentWindow { private int _clickCount; public MainWindow () { InitializeComponent(); } private void Button_Click (object sender, RoutedEventArgs e { _clickCount++; ResultText.Text = $"Button clicked {_clickCount} times." ; } }
删去了大量无用的using
更正继承为FluentWindow
添加了按钮逻辑
输入框交互 1 2 3 4 5 6 7 8 9 10 11 12 13 14 15 16 17 18 19 20 21 22 23 24 25 26 27 28 29 30 31 32 33 34 35 36 37 38 39 40 41 42 43 44 45 46 47 48 49 50 51 52 53 54 <ui:FluentWindow x:Class="WpfUiDemo.MainWindow" xmlns="http://schemas.microsoft.com/winfx/2006/xaml/presentation" xmlns:x="http://schemas.microsoft.com/winfx/2006/xaml" xmlns:d="http://schemas.microsoft.com/expression/blend/2008" xmlns:mc="http://schemas.openxmlformats.org/markup-compatibility/2006" xmlns:ui="http://schemas.lepo.co/wpfui/2022/xaml" xmlns:local="clr-namespace:WpfUiDemo" mc:Ignorable="d" Title="MainWindow" Width="720" Height="480" WindowStartupLocation="CenterScreen" Background="{DynamicResource ApplicationBackgroundBrush}" Foreground="{DynamicResource TextFillColorPrimaryBrush}"> <Grid Margin="32"> <Grid.RowDefinitions> <RowDefinition Height="Auto" /> <RowDefinition Height="*" /> </Grid.RowDefinitions> <StackPanel Grid.Row="0"> <TextBlock Text="Hi, WPF" FontSize="28" FontWeight="SemiBold" /> <TextBlock Text="Started Simple View" Margin="0,8,0,24" /> </StackPanel> <Grid Grid.Row="1"> <Grid.ColumnDefinitions> <ColumnDefinition Width="*" /> <ColumnDefinition Width="24" /> <ColumnDefinition Width="*" /> </Grid.ColumnDefinitions> <ui:Card Grid.Column="0" Padding="24" VerticalAlignment="Top"> <StackPanel> <TextBlock Text="First class, Click Button" FontSize="20" FontWeight="SemiBold"/> <TextBlock x:Name="ResultText" Text="You not click Button" Margin="0,12,0,20" /> <ui:Button Content="Click Me" Width="120" Appearance="Primary" Click="Button_Click" /> </StackPanel> </ui:Card> <ui:Card Grid.Column="2" Padding="24" VerticalAlignment="Top"> <StackPanel> <TextBlock Text="Please Input Name" FontSize="20" FontWeight="SemiBold"/> <TextBox x:Name="NameInput"/> <ui:Button Content="打个招呼" Appearance="Primary" HorizontalAlignment="Left" Margin="0,16,0,0" Click="GreetButton_Click"/> <TextBlock x:Name="GreetingText" Text="Wait you input" TextWrapping="Wrap" Margin="0,12,0,0"/> </StackPanel> </ui:Card> </Grid> </Grid> </ui:FluentWindow>
逻辑代码
1
2
3
4
5
6
7
8
9
10
11
12
13
14
15
16
17
18
19
20
21
22
23
24
25
26
27
28
29
30
31
32
33
34
35
using System.Windows;using Wpf.Ui.Controls;namespace WpfUiDemo ;public partial class MainWindow : FluentWindow { private int _clickCount; public MainWindow () { InitializeComponent(); } private void Button_Click (object sender, RoutedEventArgs e { _clickCount++; ResultText.Text = $"Button clicked {_clickCount} times." ; } private void GreetButton_Click (object sender, RoutedEventArgs e { string name = NameInput.Text; if (string .IsNullOrWhiteSpace(name)) { GreetingText.Text = "Please enter your name." ; return ; } GreetingText.Text = $"Hello, {name} !" ; } }
Binding 数据绑定练习开始,想起了三年前初学mvvm的日子 ~
小记: Orientation="Horizontal" 表示排列方向为“水平”,也就是从左到右排列。
1
2
3
4
5
6
<TextBox x:Name="NameInput"/> <StackPanel Orientation="Horizontal" Margin="0,12,0,0"> <TextBlock Text="实时预览"/> <TextBlock Text="{Binding ElementName=NameInput, Path=Text}"/> </StackPanel>
理解:
Text= 绑定的属性 也就是当前控件的文字
Binding 建立数据绑定
{}内是可执行的特殊语法代码,叫做标记扩展 (Markup Extension)
选择的ElementName是什么
获取xx的什么属性
整体样式定义 1 2 3 4 5 6 7 <ui:FluentWindow.Resources> <Style x:Key="CardTitleStyle" TargetType="TextBlock"> <Setter Property="FontSize" Value="20"/> <Setter Property="FontWeight" Value="SemiBold"/> <Setter Property="TextWrapping" Value="Wrap"/> </Style> </ui:FluentWindow.Resources>
在 <ui:FluentWindow.Resources>中 通过 Style 可以统一修改
使用示例:
<TextBlock Text="First class, Click Button" Style="{StaticResource CardTitleStyle}"/>
<TextBlock Text="Please Input Name" Style="{StaticResource CardTitleStyle}"/>
小记:
Resources:存放可复用资源,这里供当前窗口使用
x:key="Card":给样式一个查找名称
setter:指定要设置的属性和值
StaticResource CardTitleStyle:查找并使用这个样式
TargetType="TextBlock":样式适用于 TextBlock